• Skip to primary navigation
  • Skip to main content
  • Skip to footer

Tennis Nation

Be Relentless

  • Home
  • Programs & Activities
    • Tennis Adults
    • Tennis Juniors
    • Pickleball Adults
    • Pickleball Juniors
    • Competitive Play
    • Sponsorships
  • Memberships & Benefits
  • Coaches & Facility
  • Private & Group Rentals
  • Resources
    • WhatsApp Communities (Tennis & Pickleball)
  • Shop
  • Contact & FAQs

I'm Randy Reynolds

I’m a tennis professional who makes a living teaching tennis. I consider myself the luckiest person on earth. I appreciate you visiting the site, and hope you enjoy!

Taking the Ball Early on the Rise in Tennis

1 Comment

Taking the Ball Early: The “Go To” Mindset

Taking the ball on the rise in tennis is a mindset that takes focus and determination. Moving to the ball is demanding on the body and takes much more effort than waiting for the ball. That is why so many recreational players tend to wait for the ball, because it is easier on the body and naturally we do what feels best. However, if more players were aware of the benefits of moving to the ball and how the benefits apply to multiple sports, I am sure people would buy in.

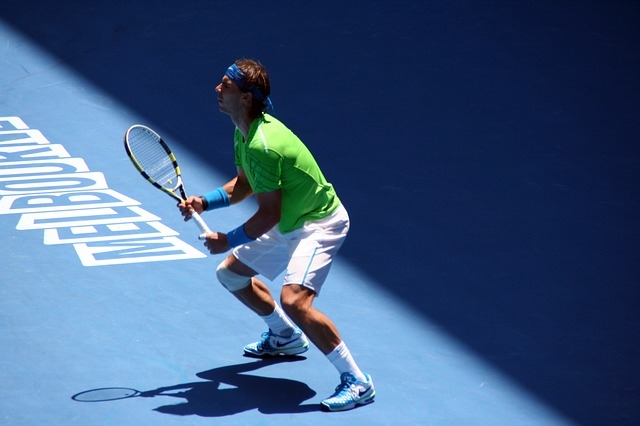
Think of some of the great athletes and ask yourself if they go to the ball or wait for the ball to come to them. Dennis Rodman went up aggressively to get rebounds as they bounced off the rim. He didn’t wait for the ball to come to him. Wes Welker moves toward the ball when catching the football on a crossing route in coverage. Andre Agassi and Roger Federer move into the court and attack the ball on the rise. When Roger gets a floater he takes the ball out of the air as a swinging volley rather than waiting for the ball to bounce. I think you get the point. All of the athletes mentioned above have the “go to” mindset. Therefore, they are more aggressive and more likely to dictate play. Not convinced? Let’s talk benefits.

Taking the Ball Early: Benefits

Pressure

  • Opponent has less time to react and set up for the incoming ball.
  • Make the opponent pay for hitting short balls and balls that float through the air.
  • Being closer to the net you can produce sharper angles that cause your opponent to cover more court.

Positioning and Set Up

  • By taking the ball early you cut off your opponent’s angles and don’t need to cover as much court.
  • By being further in the court it puts you in a better position to be offensive and attack the net.
  • By going to the ball you have greater control over the height and the contact point at which you stroke the ball.
  • Due to taking the ball on the rise you can minimize the impact of spin.
    • A prime example of this would be taking a kick serve or slice serve early so that the ball doesn’t have the opportunity to move outside of your comfort or strike zone.
  • It is favorable to simplify the backswing of the stroke to handle and redirect hard hit balls, which can help lessen unforced errors.

Taking the Ball on the Rise: Best Practices

  • When playing try to stand close to the baseline and move forward to dictate play. If your opponent hits the ball with good depth, adjust accordingly.
  • Simplify your backswing so that it goes back far enough to establish a strong load but no further. A shorter backswing will help with your timing and comfort when taking the ball early.
  • When the ball is low work on establishing a neutral or square stance and bending your knees so that your center of gravity is low. This will help maintain good posture and balance as you set up below the ball.
  • Focus on your opponent’s body language and strings prior to hitting the ball. By doing so you may get some cues and clues to the quality and direction of ball your opponent is likely to hit.
    • For example, you may hit a deep ball to your opponent’s backhand and notice that he will be reaching to hit a slice that is likely to float through the air. This may cue you to move in quickly and hit a swinging volley, if that happens to be your style.

Taking the Ball Early: General Footwork and Set up Tips

Taking the ball early requires the same great footwork you would use on all your strokes and more. These general footwork concepts are going to seem obvious if you have been around the game for some time, however a refresher never hurts.

  • Always initiate the split step prior to your opponent making contact with the ball so that you can react explosively to the ball.
  • Utilize your adjustment steps, small calculated steps, as you approach the ball and assess the optimal setup point.
  • Work hard to move your feet out behind the ball so that your last step to the ball is forward into the court rather than horizontal toward the sideline.
    • By doing so you allow your hips to unload into the ball, where as if the last step is to the side the hips have a difficult time rotating through.
  • Focus on keeping your head still through contact. This will help with your point of contact and timing.
    • If your head were to change elevations or move horizontally at contact, more than likely your racquet head will follow which commonly results in miss hits.

The Drill for Taking the Ball Early or on the Rise in Tennis

Taking the ball on the rise can be taught and implemented through training. Working on taking the ball early can be physically exhausting and mentally draining. As you practice remember to enjoy the process of what you are doing and as long as it is effective, the results will come.

The drill that I have found effective for improving my ability to take the ball on the rise is where my partner and I stand inside the baseline and exchange ground strokes. First, position yourself two feet inside the baseline. Second, begin to rally with your partner. Third, move in on each short ball ensuring to take the ball on the rise. Lastly, lets cover what to do on balls that most people find challenging during this drill.

Low Balls: Lower down with your legs on balls that are hit low around your feet and hit your ground strokes. If you have to take adjustment steps back to allow for the ball to rise up to your preferred contact point do so, however only when necessary.

Balls that Sail Long: If the ball is headed long go ahead and practice your swinging volley. This will help you attack balls that float through the air and improve your hand eye coordination.

Taking the Ball Early: What You Need to Implement

Taking the ball early in tennis isn’t all sunshine and rainbows; it takes a lot of hard work and dedication. Through practice and doing the best practices and the drill mentioned previously you should be able to improve these key skills for taking the ball on the rise:

  • Read the ball sooner
  • Set up for the stroke earlier
  • Improve your timing and hand eye coordination
  • Improve your footwork and move quickly to the ball
  • Begin to hit with more topspin, court distance is shorter, need more spin to keep the ball in.

I hope you found the article helpful and please share your thoughts below by commenting and subscribe. See you on the court!

Filed Under: Free Lessons, Strategy

How to Hit a Tennis Return of Serve

2 Comments

Tennis Return of Serve: Importance

The tennis return of serve is the second most important shot in tennis behind the serve. The first shot you hit in half the games you play will be the return of serve. Most players would be satisfied neutralizing their opponents serve with their return. Others have developed their return into a weapon putting pressure on their opponent and giving them an advantage. Andre Agassi had one of the greatest returns of all time and is a great person to emulate and learn from.

The biggest mistake people make on the return of serve, myself included, is not practicing the shot enough. The only way to develop the return of serve into an effective shot is to put in the hours of consistent practice and focus on doing the fundamentals correctly.

Where to Stand for the Tennis Return of Serve

tennis return of serveLet’s begin with the basics on positioning yourself horizontally on the baseline. When you select where to stand for the return, imagine there is string tied to your opponent’s racquet and the string extends all the way over the net into the service box on your side of the court. One string is extended down the center of the service line and one out wide where the service line and singles line intersect. To be neutral you can stand in the center of those two points to play both options equally. However, if your opponent favors one service location over the other, you may decide to favor that side by opening up the court to his/her least desired serve, which could be your strength as well. Realize where you stand for the return should be influenced by several factors.

What Works Best?

On the tennis return of serve there are different options for where to stand which can be influenced by your style of play, your hand eye coordination, and your opponent’s serve. The standard for where to stand on the return without taking into account any other variables is around three feet behind the baseline. However, all the different variables are important and should be considered, so keep that in mind throughout this post.

Generally as an all court attacking player, standing as close as you can while having enough time to react to the serve and control the return is a great option. By standing closer to receive serve you can cut off angles and have a better opportunity to play spin serves that may be moving away from you. For example, second serves generally are hit with more spin with less pace than first serves and that is why the majority players move in to return the second serve. Additionally as an attacking player you want to take the ball earlier and be positioned closer to the baseline after the return so that you can have the best opportunity to dictate play.

Baseliners, such as clay court specialists, or players that extend rallies to wear down their opponents may choose to stand further back on the return. If your goal is to wear down your opponent and extend rallies you may find standing further back to be a good option. You have more time to react to the serve and more than likely will be able to get the serve back into the court to work your way into the point or even neutralize the serve. The disadvantage would be that by standing further back you open up the court to greater angles and provide your opponent with more time to set up for the next shot.

Your Tennis Return of Serve

It is up to you to determine where to stand for the tennis return of serve and it may vary depending on the player you face and what takes place during the match. Be open to mixing up your strategy if it isn’t working.

Hitting the Tennis Return of Serve: Preparation

When preparing for the return of serve you want to be in the ready position. The ready position is the athletic stance where your feet are around shoulder width apart, standing light on the balls of your feet, and ready to react to your opponent. For a more in depth explanation see the ready position listed under the Footwork section.

When thinking of the preparation phase of the return of serve, there are a few other key elements that come to mind. You want to stay loose and energetic for the return of serve, focus on the ball, and react to the ball.

Stay Loose and Energetic

Being light on your feet and loose is crucial on the return. Many professional athletes bounce up and down on the balls of their feet prior to their opponent beginning their service motion. By being light on your feet, your split step and movement toward the return will happen more quickly. Also, by keeping your upper body and hands loose for the return will allow you to accelerate the racquet head more effectively.

Focus on the Ball

Watching the ball from the beginning of your opponent’s service motion to around four feet in front of you is critical to prevent miss hits. By watching the ball during your opponents service motion you can pick up on the location of the toss and how the racquet is making contact with the ball. These factors can help you anticipate what type of serve is coming and where it is headed. For example, if the ball is over your opponents head, generally you can anticipate a topspin serve is headed your way.

Once the serve reaches about four feet in front of you it is very important to keep your head still and level through the return. Often, players will move their head prior to impact to see their opponent or where their ball is headed out of habit. When the head changes elevations your racquet head changes elevations as well which commonly results in miss hits. When the ball gets to be around four feet in front of you, it is extremely difficult to watch the ball further due to the ball traveling so quickly. Don’t worry if you cannot see the ball all the way to contact on the return because it is essential that your head stays still through contact.

Reacting to the Ball

When your opponent is winding up for the serve take a step forward and look to time your split step. The step forward prior to initiating the split step is utilized to generate some forward momentum and the step forward can be done with whatever foot you choose. When the server is making contact with the ball the returner is still slightly in the air and in the process of landing the split step. The reason why the returner is still in the air when the opponent is contacting the ball is because he doesn’t know where the ball is headed until well after the ball leaves the server’s strings. By the time you land the split step you will know which direction to react and your weight will be loaded in your legs so you can react explosively to the serve.

Pro Tip

Timing the forward step into the ball, followed by the split step, is critical to your return of serve. The timing of the forward step is dependent on your opponent’s service motion. Each player has a slightly different motion which may be longer, like Pete Sampras’s motion, or shorter like, Andy Roddick’s motion. The key take away is to time the forward step so that you are in the air or in the process of coming down into your split step as your opponent makes contact with the ball.

Tennis Serve Return: Set Up

Once landing the split step react toward the ball and take the racquet back. The first movement is to turn your hips and take a step out to the ball with your outside foot. The turn of the hips will naturally rotate your shoulders and create your backswing. The backswing on the return is much shorter than a normal groundstroke and doesn’t include a loop due to having less time to react and set up for the ball.

The movement to the ball is forward and diagonal when the serve is hit away from your body. On the return of serve it is okay to step across the body to hit the ball due to the serve generally traveling at a higher rate of speed the movement is frequently needed out of necessity.

Tennis Return of Serve Swing

tennis return of serveAs you step toward the ball you will swing your racquet forward to make contact with the ball at the same time. Like a forehand and backhand the contact is out in front of the body and the follow through takes place finishing around the other side of the body to complete the stroke.

Pro Tip

Focus on keeping your backswing as short as possible. I have found that practicing ground strokes so often and neglecting the return translates into having a larger backswing on the return. It is going to take a lot of hours of practice to correct but it will be worth it when you find yourself progressing on each return game.

Tennis Return of Serve Best Practice

When I split forward for the return of serve I think about allowing my elbows to come forward off my body so that my elbows are resting slightly out in front of my core. This helps me limit my back swing when I rotate my shoulders and hips. Try it out!

If you found value in this guide follow the link provided for a complete list of guides on tennis technique.

Want to share some of your return of serve best practices? I would love to hear from you by leaving a comment below. See you on the court!

Filed Under: Free Lessons, Technique Tagged With: learn to return serve

Tennis Overhead Smash & Scissor-Kick Overhead

Leave a Comment

Tennis Overhead Smash

The tennis overhead smash is one of the most explosive strokes in the game. At the professional level the overhead typically results in either a winner or their opponent barely getting a racquet on the ball. Pete Sampras put his flare on the overhead smash in the 90s by leaping into the air to crush the ball, the equivalent to a slam dunk in basketball. The majority of overheads are hit up at net, however an overhead can be hit from anywhere in the court given the right ball.

When you come up to net there are two ways your opponent can attempt to get the ball past you. Your opponent can try to hit a passing shot that goes around you, or a lob that is hit over your head. If you want to be effective up at net you must develop an offensive overhead.

Tennis Overhead Smash: Grip

The overhead is hit with the Continental grip. There are a couple reasons why utilizing the Continental grip makes sense. First, the Continental grip allows your arm and wrist to pronate naturally through the ball on the overhead, which results in more power and options on the overhead. Second, when you play up at net you have limited time to react to the ball so utilizing the Continental grip for serves, overheads, and volleys allows for you to react to the ball without having to utilize time to transition to a different grip.

Tennis Overhead Smash: Preparation

The overhead smash and serve are mechanically very similar; however the overhead is simplified due to other variables at play that can complicate the stroke. The following are steps in the preparation phase that are instrumental in developing a fundamentally sound overhead.

Tennis Overhead Smash: Read Your Opponent and Watch the Ball

The first thing you want to do is focus on your opponent’s racquet face and body language to anticipate the type of shot that will be hit. Players typically hit overheads off of balls that are hit high in the air that are over their head or bounce over their head, also known as lobs. Some key items to look for to anticipate the lob are the opponent stretching out or reaching to hit the ball on the run or an open racquet face with their upper body leaning back.

Tennis Overhead Smash: React to the Ball and Move into Position

As the ball is being hit by your opponent you want to split step. As you begin reacting to the lob you want to turn your body sideways and with you non-dominant hand on the throat and the hitting hand on the grip of the racquet begin moving to set up for the ball. More often than not, if it is a decent lob you will be moving back to get into position to play the overhead. You can move back in a couple of different ways. The most common way players move back is with a side step, similar to what you would do recovering back to the court. Another way players move back on the lob, especially if they need to cover a lot of ground is with the cross step. This is similar to the initial drop steps a quarterback would take prior to stepping in and throwing a pass.

Overhead Smash: Set Up

Once you reach the optimal point on the court to hit the overhead, which will be to receive the ball out in front in the plane that you would release a ball to throw, you want to have your shoulders and hips turned and loaded. Your non-dominant arm will be extended up into the air pointing at the incoming ball to allow for you to keep your head up and track the ball into your strings. Your dominant hand will do the move of an NFL quarter back by taking the racquet back toward your ear as if you were going to throw a football. At this point your hand should be holding the racquet loosely so that the racquet head drops behind your head.

Execute the Tennis Overhead Smash

Once you have set up for the overhead it’s time to execute. Just like a quarterback or pitcher would throw the ball, you want to step forward so that your weight is transferred into the ball. As you begin accelerating your racket head forward, as if you were throwing your racquet at the ball, make sure to keep your arm and hand loose to provide increased racquet head acceleration and natural pronation throughout the complete overhead motion. Your contact point is out in front of your body in the same plane you would release to throw a ball with your hitting arm fully extended. Your body weight and motion should continue in the same direction as you hit the ball after contact.

Overhead Smash Follow Through

After you make contact with the ball your racquet follows through, traveling down across your body, finishing around hip level. By now this may sound like a broken record, the follow through is the same on the serve as a quarterback’s or pitcher’s throwing hand finishes after releasing a pass or pitch.

Tennis Overhead Smash: Pro Tip

The overhead motion is simplified when compared to the service motion. The overhead motion requires the racquet to move into the trophy service pose immediately, without looping or dropping the racquet head. This is due to having limited time and to help time the ball being hit out of the air.

Tennis Scissor-Kick Overhead Intro

Now that you know how to hit an overhead smash, lets discuss the tennis scissor-kick overhead. There have been times in tennis where my movement on the overhead has kept me up at night. Have you received a lob from your opponent that you felt like you could get but you just weren’t able to get there quick enough or elevate high enough? I describe this feeling as my credit card jump. When you receive a lob that is hit particularly well you need to move quickly and at times elevate to hit the ball. To do this you can utilize the scissor-kick overhead to give yourself a better chance to prepare for the ball and take it out of the air.

Tennis Scissor-Kick Overhead Footwork

The scissor-kick overhead is very similar to the standard overhead smash when you consider the upper body movement and initial reaction, however the footwork is different. On the scissor-kick overhead you want to drop back like a quarterback does in football. You can do this by utilizing the cross step. After you split step and turn your body you can step across your back foot with your front foot and then step back with you back foot. This cross step can be repeated as many times as you need to cover ground quickly.

Scissor-Kick Overhead: Set Up

Once you are ready to hit the overhead you want to set up and load. To load up you want to step back with your back foot and load your weight onto it so you can push off and jump into the air. Once you are in the air the scissor-kick of the legs allows you to rotate your hips and shoulders around into the shot. When you land you should find yourself on your front foot.

Upper Body Motion

The upper body movement on the scissor-kick overhead is similar to the standard overhead smash however it is worth going over. I want to start off by saying that there are different ways to hold the racquet while you are getting into the position and there is wiggle room on what you want to decide to do. You can have your arms up in the trophy pose while you move, using your non dominant hand to track the ball into your strings, or you can hold the throat of your racquet with your non dominant hand in a position similar to what a quarterback would look like holding the football on a take back. The argument for doing the second option is that you can move quicker to the ball with your hands around chest high than with your hands around or above head level.

Once you are getting ready to set up and load your weight on your back foot your upper body should be in the trophy pose. As you push off your back foot for the ball your racquet will drop back behind you as if your arm was loaded up to throw a ball with your hand loosely laid back. As your racquet accelerates up to strike the ball your non dominant hand will naturally begin to drop.

Tennis Scissor-Kick Overhead: Pro Tip

There is a lot going on during the overhead. Try to think about the big picture and relate the motion back to throwing a ball. This may help make sense of it all, since you would probably prefer to only focus on one or maybe two things at a time.

If you found value in this guide follow the link provided for a complete list of guides on tennis technique.

I hope you have enjoyed this article and want to comment by saying something below. If you feel this article can help tennis players please share it by using the social media share buttons. See you all on the court!

Filed Under: Free Lessons, Technique Tagged With: scissor-kick overhead, smash overhead, tennis overhead

Tennis Serve Technique & Fundamentals Guide

Leave a Comment

Tennis Serve Technique & Fundamentals

The tennis serve technique is the most important stroke in the game because in order to start a point you need to hit the serve successfully in the court. Just like a pitcher in baseball can pitch no hitters, the server in tennis can also dictate play and win points with the serve alone. In order to develop your serve into a weapon you must have solid fundamentals. Let’s get started!

Tennis Serve: Grip

The Continental grip is the standard when it comes to hitting the tennis serve. The Continental allows your forearm and wrist to naturally pronate, or snap, through the ball which results in more racquet head speed with the least amount of stress on the arm. All the different types of serves can be hit utilizing the continental grip which is not the case with other grips. For a guide on how to find each grip click the link.

Tennis Serve Technique: Set Up

tennis serve techniqueWhen approaching the baseline to set up for your serve you want to place your foot at around a 45 degree angle in relation to the baseline and have your feet shoulder width apart, with your shoulders and hips closed almost perpendicular in relation to the net.

Tennis Serve Fundamentals: Ball Toss

The toss is one of the most crucial components of the serve and the component that frustrates players the most. To hold the ball you want to have the ball in between your finger tips and the palm of the hand. The toss motion should be initiated with the shoulder and the arm acts as a lever. When your non-dominant hand is tossing up the ball, imagine that a ruler is strapped to your arm keeping your arm straight. The toss, with exception of extreme topspin serves and the kick serve, should be in the same plane where you would release to throw a ball, out in front of your body and to the right if you serve right handed.

Tennis Serve Technique: Pro Tip

Think about tossing to your target on the ad side of the court for right handed players and the deuce side for lefties. This typically results in the non-dominant arm moving toward the target, out in front of your body to the right, rather than running parallel to the baseline.

To determine how high to toss the ball lift your racquet straight up into the air as high as you can with your dominant hand. Having your racquet reach the center of your racquet face, the sweet spot, and up is acceptable, however the higher you toss the ball the harder it is to control. Some players like to have the ball go up into the air and drop slightly before contact and others prefer to hit the ball at its apex as the ball sits in the air. Neither way is right or wrong, it is more of a preference. See what works best for you.

Tennis Serve Technique: Pro Tip

To Practice the toss place your feet as described above to prepare for the serve. Place the butt of the racquet handle on the ground so that it looks like an extension of your front foot. This will set the racquet face out in front of your body where you would release to throw a ball. With your non dominant hand toss the ball up to the height that will work best for you, as described above, and try to have the ball land on the face of your racquet.

Tennis Service Motion Technique & Tips

tennis serve fundamentals

When going through your motion you want to keep the serve simple by keeping your hips, shoulders, and head in the same plane. So, if you were to take a photo someone could draw a straight vertical line through those segments of your body.

To practice the motion of the serve there are a few key points to consider. When taking the racquet back you want to think about doing it slowly, this will give your body time to load and establish a rhythm. The dominant arm should be loose like a wet noodle to help create a fluid motion.

For the serve you want to have your body weight going up and out into the court. To accomplish this you can rock your body weight onto your back foot and transition the weight up and out into the serve with your legs.

Think of a pitcher in baseball. The pitcher has his weight neutral as he grips the ball and decides what pitch to deliver. Once he is ready, his non- dominate leg lifts up to put his weight on his back foot and then transitions the weight forward to deliver the pitch.

The prime example of rocking the weight back would be Pete Sampras. Sampras lifts his non-dominate foot up slightly to rock his body weight onto his back foot before he transitions his weight up and out into the serve.

Tennis Serve Technique: Smooth Service Motion

Try this exercise to develop a smooth service motion based on your own throwing motion. You will need two items, a long tube sock (socks made for baseball would work), and at most six tennis balls. Fill the tube sock with tennis balls so the tube sock has weight and can build momentum when swung.

Start with your body positioned as you are going to his a serve and pretend the tube sock is your racquet. Go through the service motion, with the non-dominant hand mimicking the toss and all. Think of throwing the tube sock high over the net without letting go. The tube sock will ideally be in continuous movement and make contact with your body less as your throwing and service motion become more fluid.

This exercise can help prevent hitches in your service motion and help all the links in the kinetic chain to flow together. Once you get the hang of your service motion you will be able to continuously go through the service motion time after time without stopping the sock. Try it out!

Tennis Serve Technique & Fundamentals: Wrap Up

The tennis serve technique is the biggest weapon on tour and the tips and drills mentioned in this serve lesson have helped my students, myself, and hopefully you.

If you found value in this guide follow the link provided for a complete list of guides on tennis technique.

I thank you for your support and look forward to hearing from you by commenting below or connecting with me on social media. Cheers!

Filed Under: Free Lessons, Technique

How to Hit an Effective Tennis Approach Shot

1 Comment

Tennis Approach Shot: Introduction

The tennis approach shot is utilized to transition from the baseline up to net. Generally a player approaches to the net on a ball that lands around the service line or shorter, or if they recognize that their opponent is out of position and is likely to provide a weak ball as a result.

For example, you hit a fast pace forehand cross court and you see that your opponent is barely going to get their racquet on the ball, their arm is fully extending reaching for the ball, you decide to take advantage by moving forward to the net to make a play on the ball resulting in your opponent not having enough time to recover and make a play on your easy volley. You win the point easily.

Moving forward to play a short ball can benefit you in many ways including taking time away from your opponent, shortening the duration of the point, and by putting pressure on your opponent.

Tennis Approach Shot: Footwork

Split Step

The approach shot is one of the most exciting shots in tennis and it all starts with the feet. Like on other shots you want to time your split step to make contact with the ground at the exact moment you realize where the ball is headed.

Ensure the Proper Spacing

Once you recognize the ball is short you want to start running forward while you assess exactly where you expect the ball to land. Once you have assessed where the ball will land you want to run up at an angle to the ball so that when you begin to set up for your forehand or backhand you have enough room between you and the ball.

Tennis Approach Shot Pro Tip

It is common for players to run into the ball and as a result they hop up on their stroke or their shoulders rise up as the body attempts to create more space. If this happens to you try this tip. Once you turn to set up for the ball begin moving your feet by making small shuffle adjustment steps around and away from the ball. This allows for several little steps to be taken to ensure you find the proper distance on the approach shot.

Tennis Approach Shot: Options

tennis approach shotThe approach shot is unique in the sense that you can utilize any stroke in the game and choose to approach the net afterwards. For example, some players pick up on their opponent’s movements and if a player allows balls to drop rather than take the ball on the rise they may choose to throw up a topspin lob and approach the net giving them plenty of time to react to the next ball. Or a player may notice their opponent has difficulty moving forward and chip the ball short and take the net, the possibilities are endless. For the purpose of this post we will look at the approach in terms of the forehand and backhand.

Tennis Approach Shot: Stroke

The tennis approach shot stroke will be the same as the forehand and backhand outlined in prior posts with a couple differences depending on the ball height and where the ball is located in relation to the net. I recommend you utilize the neutral stance strokes for the approach shot since your body weight is moving forward and if the ball happens to be low it is easier to handle, however plenty of top tennis professionals hit open stance as well so you decide what is best for you given the ball you receive.

The approach shot is most effective when the ball is taken on the rise and hit from waist to chest height. This is due to most approach shots being generated off of weak replies and the sooner you get to the ball the less time your opponent has to recover and react. By having a waist high or higher ball you can focus on hitting through the ball, more pace, rather than creating lift, more spin, which is done for balls below net height. The location of the ball in relation to your body and the net will also determine the angle of the racquet face at contact. When the ball is high, one foot or more above the net, you may be able to close your racquet face more when driving through the ball. When the ball is low, below net level, your racquet face will be more open in order to create lift.

Tennis Approach Shot: Final Thoughts

The tennis approach shot is one of the most exciting shots in the game. If you like to be aggressive on the court and put pressure on your opponent, the approach shot is definitely worth your time and focus.

If you found value in this guide follow the link provided for a complete list of guides on tennis technique.

Get out there and practice! Report back what you find works and doesn’t work for your game so that others can benefit as well. Cheers!

Filed Under: Free Lessons, Technique

5 Steps to Hitting a Tennis Backhand Slice

Leave a Comment

Tennis Backhand Slice

The tennis backhand slice can be effectively utilized in numerous scenarios however the stroke is often underutilized. Tennis players utilize the slice to buy themselves more time to recover back to the center of the court, keep the ball low for their opponent, and as a change of pace during a rally. In scenarios where hitting the ball is uncomfortable on the backhand, commonly due to the ball being too high or too low, players tend to find more comfort hitting a slice backhand.

Tennis Backhand Slice #1: Pivot and Shoulder Turn

As you turn your shoulders you want to transition over to the continental grip for your slice. There is wiggle room on which grip to utilize as several players use slight variations.

Tennis Backhand Slice #2: The Back Swing

tennis backhand sliceWhen taking back the racquet you want your dominant forearm and your racket to form an L shape. Your non-dominant hand will be holding the throat of the racquet with the elbow raised up away from the body. Both of your shoulders and arms will take the racquet all the way back, so that the racquet head is behind your head and above shoulder height.  On the take back you can use your hands to keep the racquet face slightly open.

Tennis Backhand Slice #3: Step into the Slice

Now that you have your weight loaded on your back foot and the racquet back all the way you are ready to step into the slice. Step into the ball just as you would on your one or two handed backhand with your foot angled around 45 degrees give or take.

Tennis Backhand Slice #4: Swing to Contact

With your weight transitioning forward you want to swing your racquet high to low till you contact the ball. Your high to low swing will be initiated by your shoulder and will make contact with the ball around waist high and out in front of your body ideally. However, as mentioned previously the height at which you take the ball can vary. Although your swing is going high to low you want to think about hitting through the ball with a very slight high to low path of the racquet. Having the racket face slightly open to neutral, along with the low to high swing, will help impart the desired backspin on the ball.

Slice Backhand Pro Tip

On the slice if you find that the ball takes off high up into the air, commonly it is due to having the racquet face angled open too much. Try closing the racquet face slightly until the ball begins to level out.

On the slice if you find that the ball is sitting up in the air after it bounces rather than skidding and staying low after the bounce, you may be striking through the ball at too sever of a high to low angle. Try striking through the ball more at a very slight high to low plane until the ball begins to skid on the bounce and stay low.

Tennis Backhand Slice #5: Follow Through

The follow through is the final step in the slice backhand and is important in order to create a smooth and consistent stroke. After you strike through the ball you want to let your arms naturally rise as they extend outwards. This will help you produce a smooth stroke while decelerating naturally.

When striking through the ball and during the follow through you want to stay turned. Imagine you are standing in your hallway at home that was just freshly painted. You don’t want to hit or scratch the walls so you are going to stay turned, swinging your arms out in opposite directions so that you finish in a pose that would be similar to an image of a person holding a bucket of water in each hand with their arms extended out. By having your non-dominant arm swing out in the opposite direction as you hit the ball and follow through, your upper body will tend to stay closed and not open up. On the slice not opening up at contact is a good thing.

If you found value in this guide follow the link provided for a complete list of guides on tennis technique.

What have you found that works or doesn’t work for your slice backhand? Let me know by leaving a comment below and come say hi to me on Facebook, I will definetley respond!

Filed Under: Free Lessons, Technique Tagged With: backhand slice

How to Hit a Two-Handed Backhand Groundstroke

Leave a Comment

Tennis Two-Handed Backhand

The two-handed backhand groundstroke is one of my favorite shots in tennis although I find it takes more energy to hit. Due to having both hands on the racquet your footwork needs to be on point, otherwise it can feel overwhelming. Check out the prior post titled Tennis Backhand Groundstroke Ultimate Guide to catch up on the movement and preparation required to hit an effective backhand. With that being said let’s begin!

Two-Handed Backhand Groundstroke: Unit Turn

On the two-handed backhand when you begin your backswing you want to do as what is referred to as a unit turn. Think of the upper body, the shoulder, the arm, and the hand as a unit. When taking back the racquet the shoulder initiates and performs the turn and the elbows and arms stay fixed. Before accelerating the racquet forward you want to drop the head of the racquet so that your arms are extended and your racquet head is below the ball.

Tennis Two-Handed Backhand: Backswing

The backswing and the load on the back foot happen at the same time. Once both are complete, your racquet butt should be pointed toward the net and the racquet head will have dropped back so that the racquet head is hidden from your opponent but not so far back that the head of the racquet is behind your body. Once complete, it’s time to initiate the body weight and racquet head forward into the ball.

Two-Handed Backhand: Weight Transfer

There are a few components that lead to a fundamentally sound swing prior to contact on the backhand. The weight transfer happens by taking your last step forward into the ball with your right leg (assuming your right handed, the left leg if you are a lefty). Your racquet will accelerate from low to high, rising as it approaches toward the ball. Hit the ball with the swing of your arm initiated by your shoulder, not your wrist. Your racquet should make a right angle, with some wiggle room, with your arms throughout the swing.

Two-Handed Backhand Groundstroke: Contact Point

Your ideal contact point is around hip height and the dominate arm should be extended when you meet the ball slightly out in front of your body. As you accelerate your racquet head forward, your wrists stay laid back, during and after contact your hands extend forward naturally into the court.

Tennis Two-Handed Backhand: Follow Through

two-handed backhand groundstrokeAfter you contact the ball think of extending your racquet forward through the court as if someone was pulling your hands forward after contact. This will help ensure you make solid contact and keep you from bending your elbows prematurely. On the follow through you will find that your elbows stay off of your chest and the racquet head finishes high around your right shoulder if you are right handed and around your left shoulder if you are a lefty.

Two-Handed Backhand Groundstroke: Pro Tip

If you find your elbows touch or rest on your chest after contact you may want to focus on extending your arms further out into the court after contact. My coach growing up would say to think about hitting through six balls rather than one.

If you found value in this guide follow the link provided for a complete list of guides on tennis technique.

Lastly, what would you add to the two-handed backhand groundstroke? If you have found something that works for you and want to share your best practices or have any questions please leave a comment below and I will make sure to respond. Cheers!

Filed Under: Free Lessons, Technique Tagged With: two-handed backhand

Tennis Backhand Groundstroke Ultimate Guide

Leave a Comment

Tennis Backhand Groundstroke: Options

There are a few different types of tennis backhand groundstrokes which you can use to hit the ball effectively. The one-handed backhand, the two-handed backhand, and the slice backhand. All the backhand options have their strengths and weaknesses, however when implemented in certain strategic situations the selection can make a profound impact.

Tennis Backhand Groundstroke: Stances

There are two main backhand groundstroke stances, the neutral stance backhand which is more traditional and the open stance backhand which is more modern. Both types of backhands are utilized amongst professional players today and both can be effective at all levels of play. Unlike the forehand, the majority of tennis teaching professionals agree that both stances are beneficial for players to have in their arsenal.

What is the Best Tennis Backhand Groundstroke?

When the ball is around the center of the court and the player has enough time to set up for the ball most professionals will hit neutral stance backhands and when pushed off the court and need more time to recover players will tend to hit open stance or slice the ball back. Where debate lies is on shot selection when pulled off the court, whether to hit open stance or slice the ball back to buy more time and recover, it is a matter of court situation and strategy.

The Backhand Groundstroke Grip

two-handed backhand gripThere are different backhand grips to choose from, the continental grip, the semi-western backhand grip, and the eastern grip. The majority of the professional tennis players utilize a semi-western backhand grip for the one handed backhand, and a continental grip with the dominant hand and an eastern grip for the non-dominant hand on the two handed backhand. I prefer my students utilize either of the two options or something in between. With grips there is always a little wiggle room because each player will adjust slightly to what feels most natural. Both grips allow the player to drive through the ball and generate topspin effectively.

Tennis Backhand Groundstroke Pro Tip

An easy way to grip the racquet with the one handed backhand grip is to hold the racquet by the throat extended out in front of your body with your non dominate hand and your strings facing out in front of you, then place your dominant hand on the grip with your dominate arm extended as well.

Backhand Groundstroke: Preparation Phase

Footwork

The footwork is the foundation of solid preparation and that is what we will focus on first. Before the ball reaches your opponents racquet you will want to try and time your split step so that your feet hit the ground at the exact moment you realize the direction your opponent’s shot is traveling.

Now that you recognize the ball is traveling toward your backhand side you want to react to the ball. The first step is to pivot and load your weight onto your outside foot and begin rotating your shoulders and hips. Once complete you can push off your outside foot and react toward the ball. One thing you will find is that by rotating your shoulders and hips, your racquet will naturally begin to be taken back as well.

Tennis Backhand Groundstroke Pro Tip

You will find that your hip and shoulder turn will naturally take back the racquet in the preparation phase not the arms. However, the arms are used to control the racquet head angle and positioning while on the move.

Tennis Backhand Groundstroke: Strike Zone Set-Up

Once you approach the ball it is critical to focus on taking the necessary adjustment steps to ensure you have enough distance between you and the ball before setting your feet. Typically when I mention spacing I am referring to the horizontal distance between your body and the ball. Equally important however, is utilizing your movement to ensure the ball is going to rise or drop into your comfort zone, which is around waist high generally, before you set your feet.

The Grip Change

When on the move you want to change your grip to the backhand grip that you desire. The majority of tennis players have their dominant hand resting in the forehand grip when at the baseline and adjust the grip as needed.

To change your grip you want to support the head of the racquet with your non dominant hand by placing it on the throat of the racquet for the one-handed backhand or by keeping your non dominant hand on the grip for the two-handed backhand. This will allow you to rotate the racquet with your non-dominant hand, which will be a slight turn, until you reach the desired backhand grip. Then you simply re-grip the racquet with your hand, keeping it slightly loose to ensure your hand doesn’t get tired.

Unit Turn Pro Tip

The shoulder and hip turn happen at the same time as your grip change.

The Set Up for the Neutral Stance Backhand

Now that you have the proper grip and you have the ball in your comfort zone, you want to set up your feet and upper body to stroke through the ball. You want to load your weight onto your back foot, which is the left foot if you are right handed, and step into the ball with your right foot. Ideally your feet will be lined up as if you were riding a skateboard or snowboard, which will allow you to open up your hips and shoulders efficiently. This stance will point your shoulders and hips in the direction you want to hit the ball.

Backhand Groundstroke Pro Tip

To load your weight onto your back foot try bending your back knee slightly as if you were going to begin sitting down. I find it more difficult to transfer my weight into the ball on the backhand, however by starting with a great load on the back foot sets the stage for a quality weight transfer.

Next Up: Two-Handed Backhand Groundstroke

These backhand groundstroke tips will help you prepare to hit an effective stroke whether you hit with one or two hands. Some of the items mentioned such as the grip change and the set up with the feet may seem foreign and challenging at first, however overtime you will build the muscle memory and be able to focus on another area of your game to improve. On the next post we will cover the tennis two-handed backhand groundstroke.

If you found value in this guide follow the link provided for a complete list of guides on tennis technique.

Let me know your thoughts and what you find helps you set up for the backhand groundstroke effectively by leaving a comment below. Cheers!

Filed Under: Free Lessons, Technique

  • « Go to Previous Page
  • Page 1
  • Interim pages omitted …
  • Page 3
  • Page 4
  • Page 5
  • Page 6
  • Go to Next Page »

Footer

Tennis Nation Racquet Sports

Operating the Reno Tennis Center

Reno Tennis Center
2601 Plumas St
Reno, NV 89509

Start Booking Today with CourtReserve

Get Your Free Guest Membership

Stay Connected Off the Court

WhatsApp Communities
  • Home
  • Programs & Activities
  • Memberships & Benefits
  • Coaches & Facility
  • Private & Group Rentals
  • Resources
  • Shop
  • Contact & FAQs

Copyright © 2026